
Bring the power of the Force to your Christmas tree with this super adorable Santa Yoda Christmas Ornament! Christmas Santa Yoda free pattern is quick and easy to make and he’s the perfect stocking stuffer for any Jedi in your life.
Skill Level: Beginner
Finished Dimensions: Approx 3.5” tall
Material:
– Worsted weight yarn (Red Heart Super Saver or similar): Green, red, white
– Size F / 3.75mm crochet hook
– 9mm safety eyes
– Fiberfll stufng
– Yarn needle
– Scissors
– Stitch marker
Abbreviations
All details below are based on US crochet terms
Mc: Magic Circle
Ch: Chain
Sc: Single Crochet
Sl: Slip Stitch
Inc: Increase
Dec: Decrease – I recommend the Invisible Decrease
Dc: Double Crochet
Bobble Stitch
Pattern Notes:
– You will work in a continuous spiral for most of the pattern, except the ears and the beginning of the hat. Use a stitch marker and do not join rounds or turn (unless otherwise stated).
– When reading the pattern, (_,_)*x means that you repeat the instructions in the bracket “x” number of times. For example, (Sc 1, Inc)*6 means to repeat (Sc 1, Inc) 6 times. The number in brackets at the end of each row is the to-tal number of stitches you will have when you fnish that row.
Special Stitches & Techniques
Bobble Stitch (4 Dc)
The Bobble Stitch is used when making the Santa Hat on page 7. The stitch consists of your desired number of Double Crochets (4 Dc in this case) worked into a single stitch and secured by one loop, to create a texture that pops out from your work.
Step 1: Yarn over, insert hook into the stitch where you are going to make the bobble. Yarn over, draw up a loop – this is like the beginning of a normal Double Crochet. You will now have three loops on your hook.
Step 2: Yarn over, pull yarn through the frst two loops only. You will now have two loops on your hook.

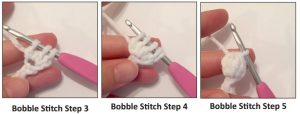
Step 3: Next, instead of fnishing the Double Crochet like you normal ly would, yarn over and insert the hook back into the stitch.
Yarn over, draw up a loop, then yarn over and pull through only the frst two loops again. You will now have three loops on your hook.
Step 4: Repeat step 3 two more times until you have fve loops on your hook.
Step 5: Yarn over, pull through all 5 loops on your hook. This will complete your frst bobble!
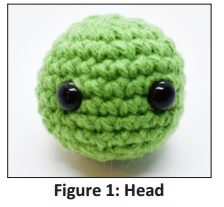
Head
Using green:
Round 1: Sc 6 in a Magic Circle (6)
Round 2: Inc*6 (12)
Round 3: (Sc 1, Inc)*6 (18)
Round 4: (Sc 2, Inc)*6 (24)
Rounds 5-9: Sc around (24)
Round 10: (Sc 2, Dec)*6 (18)
Add safety eyes between Rounds 6 and 7. Leave approx 4 stitches between the eyes.
Round 11: (Sc 1, Dec)*6 (12)
Stuff the head.
Round 12: Dec*6 (6)
Finish off and hide ends in the head.
Ear (his right)
The ears are made in rows. Ch 1 and turn at the end of each row (except Row 8). Using green:
Row 1: Ch 2
Row 2: Sc 1 (1)
Row 3: Inc (2)
Row 4: Inc, Sc 1 (3)
Row 5: Sc 1, Inc, Sc 1 (4)
Row 6: Sc across (4)
Row 7: Sc 2, Dec (3)
Row 8: Sc across (3)
DO NOT TURN. Sc around the edge of the entire ear.
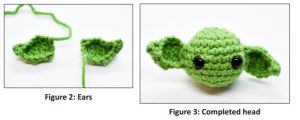
Finish off, leaving a long tail. Use the tail from Row 1 to stitch the tip into a point. (Figure 2 on next page)
Ear (his left)
Using green:
Row 1: Ch 2
Row 2: Sc 1 (1)
Row 3: Inc (2)
Row 4: Sc 1, Inc (3)
Row 5: Sc 1, Inc, Sc 1 (4)
Row 6: Sc across (4)
Row 7: Dec, Sc 2 (3)
Row 8: Sc across (3)
DO NOT TURN. Sc around the edge of the entire ear.
Finish off, leaving a long tail. Use the tail from Row 1 to stitch the tip into a point. (Figure 2)
Sew the ears to the head, with the ridged side facing to the front. (Figure 3)
Santa Hat
Using white:
Row 1: Ch 27, making sure to leave a long end of yarn at the start (you will use it later to sew the hat to his head). Do not join the chain yet.
Row 2: Starting at the 4th chain from the hook: (Bobble Stitch 1, Sl 1)*12 (24)
*See Bobble Stitch instructions on pages 3-4
Join with a slip stitch to the top of the frst bobble stitch to make a circle. Use the white end to sew the two ends of Row 1 together.
Continue now in the round.
Using red:
Rounds 3-4: Sc around (24)
Round 5: (Sc 4, Dec)*4 (20)
Round 6: Sc around (20)
Round 7: (Sc 3, Dec)*4 (16)
Round 8: Sc around (16)
Round 9: (Sc 2, Dec)*4 (12)
Round 10: Sc around (12)
Round 11: (Sc 2, Dec)*3 (9)
Round 12: Sc around (9)
Round 13: (Sc 1, Dec)*3 (6)
Round 14: Sc around (6)
Round 15: Dec*3 (3)
Switch to white, leaving a long red tail
Round 16: Bobble Stitch*3
Finish off and use the white end to sew the bobbles together into a ball.
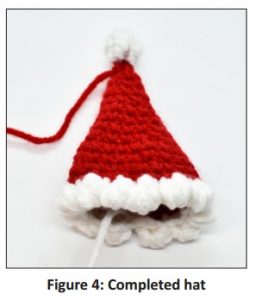
Sew the hat to the top of Yoda’s head using the long white end from the start of Row 1.
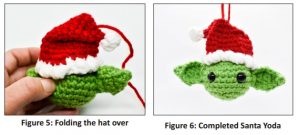
Fold the hat back and use the red end from row 14 to stitch it into place. (Figure 5) Weave in all ends.
Finally, thread a length of red yarn or red ribbon through the top of the hat and tie it into a knot (or a nice bow!). Then Santa Yoda can hang out on your Christmas tree!
If you have any questions about the pattern, please contact me and I’m happy to help. I collected this Christmas Santa Yoda free pattern from @waywardpineapplecreations.


